⚠️ Before you start, please be reminded:
- If you created your Facebook app on Meta for Developers after 1 June 2023, please refer to Facebook Account Quick Registration / Member Login (New). To learn more about frequently asked questions and troubleshooting for Facebook Account Quick Registration / Login, please refer to this article.
- The Facebook application is the assets created by your company through your Facebook personal account, which are not owned by SHOPLINE. Please pay attention to the permissions and usage conditions, especially the annual notices and data audits by Facebook. If you receive a Facebook "data usage check" message in the app inbox in the future, please reply within the deadline to prevent your app from being disabled by Facebook.
- To ensure data security, the system will automatically log out customers after 24 hours of inactivity following login. Inactivity is defined as no actions requiring an internet connection, such as reloading the page, searching for products, or submitting information.
In addition to using an email address, customers can also register as members using their Facebook accounts, giving them a quick, one-click registration and login to your store.
One-click login using a Facebook account is a feature developed by Facebook. To enable this, you must first create a Facebook application on Meta for Developers and then install it in your SHOPLINE Admin. As the setup involves several steps, please follow the instructions carefully. If you encounter any issues during the process, please take a screenshot of your screen and provide it to our Online Merchant Success Team for further assistance.
In this article, you'll find:
1. Steps to set up the Facebook login feature
Step 1. Enter Meta for Developers
Click this link to enter Meta for Developers and log in with your personal Facebook account. Go to [My Apps > Create App] to begin creating a Facebook application.
*Note: The Meta for Developers application is bound and created under a personal account. To avoid potential conflict of access permission in your company’s internal personnel, you are recommended to use your company’s Facebook personal account for convenience. Also, pay attention to Step 12 to add your company personnel-in-charge as the administrator of the application for subsequent maintenance and management.
Please be reminded that if you haven’t created any app before this, upon hitting My Apps, it will show you a page that says “No apps yet” to invite you to create your first app.
Step 2. Create a Facebook App
After clicking on Create App, you will be asked, “Which use case do you want to add to your app?” Select Set up Facebook Login then click Next.
Select which platform you will use for your app. Upon completion, click Next to continue.
The field "Add an app name" is required. It is suggested that a "Store or Brand name" be entered here. "App contact email" will be automatically filled in with the email address associated with the account as you access this page. If you have a Meta Business Manager, you can also select a platform via “Business Account” in the optional field to manage your app. Next, click Create app.
A pop-up window will appear. Please re-enter your password and click Submit to proceed.
Step 3. Add the "Facebook Login" Application
Next, you will be directed to “Dashboard.” Find Products on the left side of the page and click on it.
On the right side of the “Facebook Login” block, click on the drop-down menu and select Configure > Quickstart.
Choose Web as the platform for your app.
Step 4. Enter the store URL
Please enter your store homepage URL in the Site URL, for example, https://www.test123.com or https://www.test123.com.tw. Please make sure to fill in the securely encrypted URL starting with https://. After confirming the URL, click the "Save" button in the lower right corner and wait for the application to save the URL.
Step 5. Enter the settings in the "Basic" of the App
Next, please go to [Settings] > [Basic] in the left panel to complete the settings of the App Domains, Privacy Policy URL, User Data Deletion, App Icon, Terms of Service URL, Category, and Site URL.
1. App Domains (Required)
This field will require a total of 2 URLs (original domain and URL with subdomain). Please follow the methods below to obtain and paste them, and then press "Enter (Window) / Return (Mac)" on your keyboard to type them in the field until the URL turns into a gray box.
- If your store uses a unique URL, for example, https://www.test123.com
Please fill in 2 URLs:
www.test123.com and test123.com respectively
- If your store uses a free URL, for example, https://test456.shoplineapp.com
Please fill in 2 URLs:
test456.shoplineapp.com and shoplineapp.com respectively
Please change the above text in bold red to your store URL links. If you are unsure of your shop's unique URL or free URL, you can go to the front homepage of the store to copy it.
*Note: Please fill in your store URL instead of the official SHOPLINE URL.
2. Privacy Policy URL (Required)
The privacy policy is a statement on how the website will use the personal data of internet users. The reveal of "Privacy Terms" in your store is one of the key reviews for applying for payment, Google Advertising, Facebook app, and so on.
First, go to [Online Store Design] > [Pages] in the Admin to look up the URL of the privacy policy page. Then, paste the URL here:
If you do not have a privacy policy page, you can use the default "Privacy Policy" page or create a new one.
A. Using the default "Privacy Policy" page
For format and content, please refer to SHOPLINE Sample Store Page (please edit according to your actual use, specifications, and requirements). After the setup, enter the URL on the "2. Privacy Policy URL" block.
- If your store uses a unique URL, you will get a similar URL like:
https://www.test123.com/pages/privacy-policy
- If your store uses a free URL, you will get a similar URL like:
https://test456.shoplineapp.com/pages/privacy-policy
Please change the above text in bold red to your store URL links. If you are not sure of your shop's unique URL or free URL, you can go to the front homepage of the store to copy it.
*Note: Please fill in your store URL instead of the official SHOPLINE URL.
B. Create a new "Privacy Policy" page
Click on + Text Page or + Advanced Page to create a "Privacy Policy" page. For format and content, please refer to SHOPLINE Sample Store Page (please edit according to your actual use, specifications, and requirements, and remember to specify the "Data access and deletion" information).
The term "Privacy Policy" should be included in your SEO page title, while the descriptive URL should include "privacy-policy" so that Facebook would easily identify your page and privacy policy content. After the setup, enter the URL on the "2. Privacy Policy URL" block.
- If your store uses a unique URL, you will get a similar URL like:
https://www.test123.com/pages/privacy-policy
- If your store uses a free URL, you will get a similar URL like:
https://test456.shoplineapp.com/pages/privacy-policy
Please change the above text in bold red to your store URL links. If you are not sure of your shop's unique URL or free URL, you can go to the front homepage of the store to copy it.
*Note: Please fill in your store URL instead of the official SHOPLINE URL.
*Note: If your store is currently using
"Facebook Account Quick Registration / Member Login,"
and has previously provided descriptive URL with
"privacy-policy" to Facebook,
please do not delete the old privacy policy page
to avoid disabling the login feature.
If you want to delete the old privacy policy page
and shift to the default/new privacy policy page,
please go to "Meta for Developers" and
pages that contain the old privacy policy
to manually update it with the new URL.
3. User Data Deletion (Required)
Select "Data deletion instructions URL" from the drop-down menu.
In the "You can also provide a link" field below the drop-down menu, enter your store's homepage URL, like "https://www.test123.com" or "https://www.test123.com.tw". Make sure to fill in a secure encrypted URL starting with "https://".
4. Category (Required)
Please select the appropriate option from the menu according to the type of store or services offered in your store.
5. Terms of Service URL (Recommended)
This URL link will be displayed in the "App Terms" of the Facebook login application window. We will advise you to edit your store's default "Terms and Conditions" page and describe your service policy and transaction details based on your situation. Then, paste the page URL in this field.
6. App Icon (Required)
The App Icon will appear in the customer login process along with the "Display Name". We will suggest that you upload the store logo or brand icon for customers to reduce their concerns about fraud or informal channel collection of user information. Facebook recommends uploading images with a size of 1024 x 1024 pixels and a file size of 5MB.
7. Website URL (Required)
Then enter the homepage URL again. For example, https://www.test123.com or https://www.test123.com.tw. Please make sure to fill in the securely encrypted URL starting with https://. Click Save changes at the bottom right after confirmation.
Step 6. Complete business verification
Since 1 February 2023, business verification is required if your app requires advanced-level access.
Scroll down the page to the "Business Verification" section, and follow the instructions to complete the verification.
*Note: If you have not completed the business verification, when the customer quickly registers/logs in with the Facebook account at the storefront, it will display "Some of the following permissions below have not been approved for use by Facebook."
Step 7. Proceed to [Facebook Login] > [Settings] for setup
Proceed to the main product panel on the left and enter the "Client OAuth Login Settings" in the [Facebook Login] > [Settings] of the application.
1. Turn on the designated function switches
Enable the following 4 function switches. You can compare and confirm with the figure below after setting.
- Turn on "Client OAuth Login"
- Turn on "Web OAuth Login"
- Turn on "Use Strict Mode for Redirect URIs"
- Turn on "Enforce HTTPS"
2. Enter the link in ''Valid OAuth Redirect URIs''
Follow the instruction below and paste the corresponding link to the "Valid OAuth Redirect URIs" column. Press "Enter (Window) / Return (Mac)" on your keyboard afterward. When the URL becomes a gray text on a blue background, it means you have input successfully.
- If your store uses a unique URL, for example, https://www.test123.com
Please paste:
https://www.test123.com/users/auth/facebook/callback
- If your store uses a free URL, for example, https://test456.shoplineapp.com
Please paste:
https://test456.shoplineapp.com/users/auth/facebook/callback
Please change the above text in bold red into your store URL links. If you are not sure of your shop's unique URL or free URL, you can go to the front homepage of the store to copy it.
*Note: Please fill in your store URL instead of the official SHOPLINE URL.
After completing the settings, please click the "Save Changes" button in the lower right corner.
*Important Note: After submission, please check again whether the "Use Strict Mode for Redirect URLs" switch is turned off ("Off" status). If it is turned off ("Off" status), please turn it on (change the status to "On") and press "Save Changes" again.
Step 8. Confirm application data authorization status
Please go to [App Review] > [Permissions and Features] to confirm and enable the email and public_profile options to obtain advanced access permissions.
Please note that if your application is disabled by Facebook, you will need to complete the Facebook review before you can turn on the advanced access authorization. Please confirm that the application settings are correct and then submit it for re-review to Facebook for confirmation.
Step 9. Confirm application status
Please check the toggle switch next to the "Application ID" at the top of the App page. The switch should be "Live" so that the application can be used. (If the switch is off, it will show "In Development" status.)
When you turn on the switch, please click "Switch Mode" to set your application active. If the application is turned off, customers will not be able to log in to the store with their Facebook account!
Step 10. Prepare to enter information in the store Admin
Please check the main panel on the left, go to [Settings] > [Basic] and click the "Show" button next to "Application Secret" to display the full codes. Copy the App ID and App Secret, and return to your SHOPLINE Admin panel for setup!
Step 11. Go Back to SHOPLINE Store Settings
Method 1
Proceed to SHOPLINE Admin > [Settings] > [Customer Settings] and switch on the toggle to the right of "Facebook Login".
Once enabled, copy and paste the App ID and App Secret to the corresponding fields, then click Connect. Then click the Update button on the bottom right to save your settings, and your store will be ready to start using the Facebook Login feature.
Method 2
Proceed to SHOPLINE Admin > [Channel Integration] > [Facebook] > [Online Store Application] tab. Click the Connect button on the right of "Connect to Facebook Developer account".
Paste the App ID and App Secret into the corresponding fields, then click Connect.
Switch on the toggle to the right of "Online Shop Facebook Login", and your store will be ready to start using the Facebook Login feature.
Step 12. Set colleagues' accounts as administrators
As the Meta for Developers application is created and bound to a personal account, adding your co-workers' Facebook accounts as administrators is recommended to avoid internal operational conflicts.
Step 13. Check the Facebook login function
Congratulations! The setup has been done, and you can finally check it on your storefront!
Please enter the member login page of your store, click the "Log in with Facebook" button, and a Facebook window will pop up for requesting customers to log in and authorize your login application (Your app display name and icon appear here).
Customers must authorize the Facebook login application to access data so that they can use the Facebook login function. The Facebook login function cannot be used if the customer chooses not to authorize it.
*As there are many steps to set up this feature. If you have any questions about the App and login settings, please take a screenshot of the issue and send it to the Online Merchant Success Team. We will assist you as soon as possible.
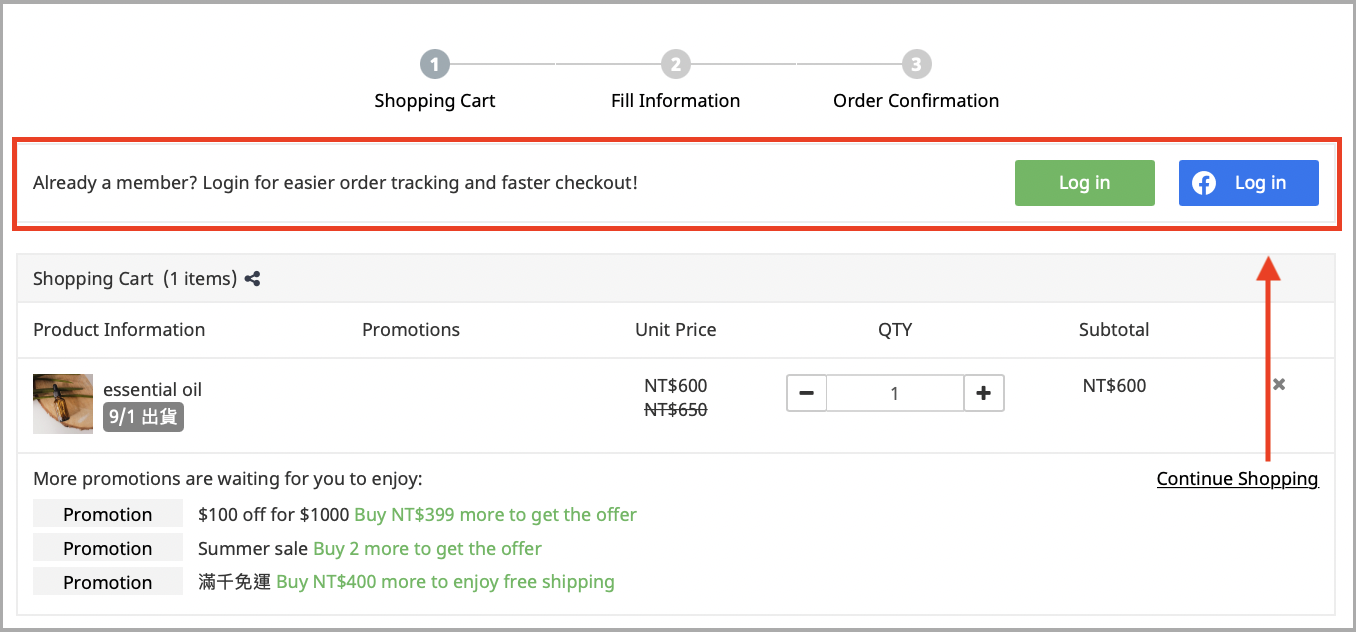
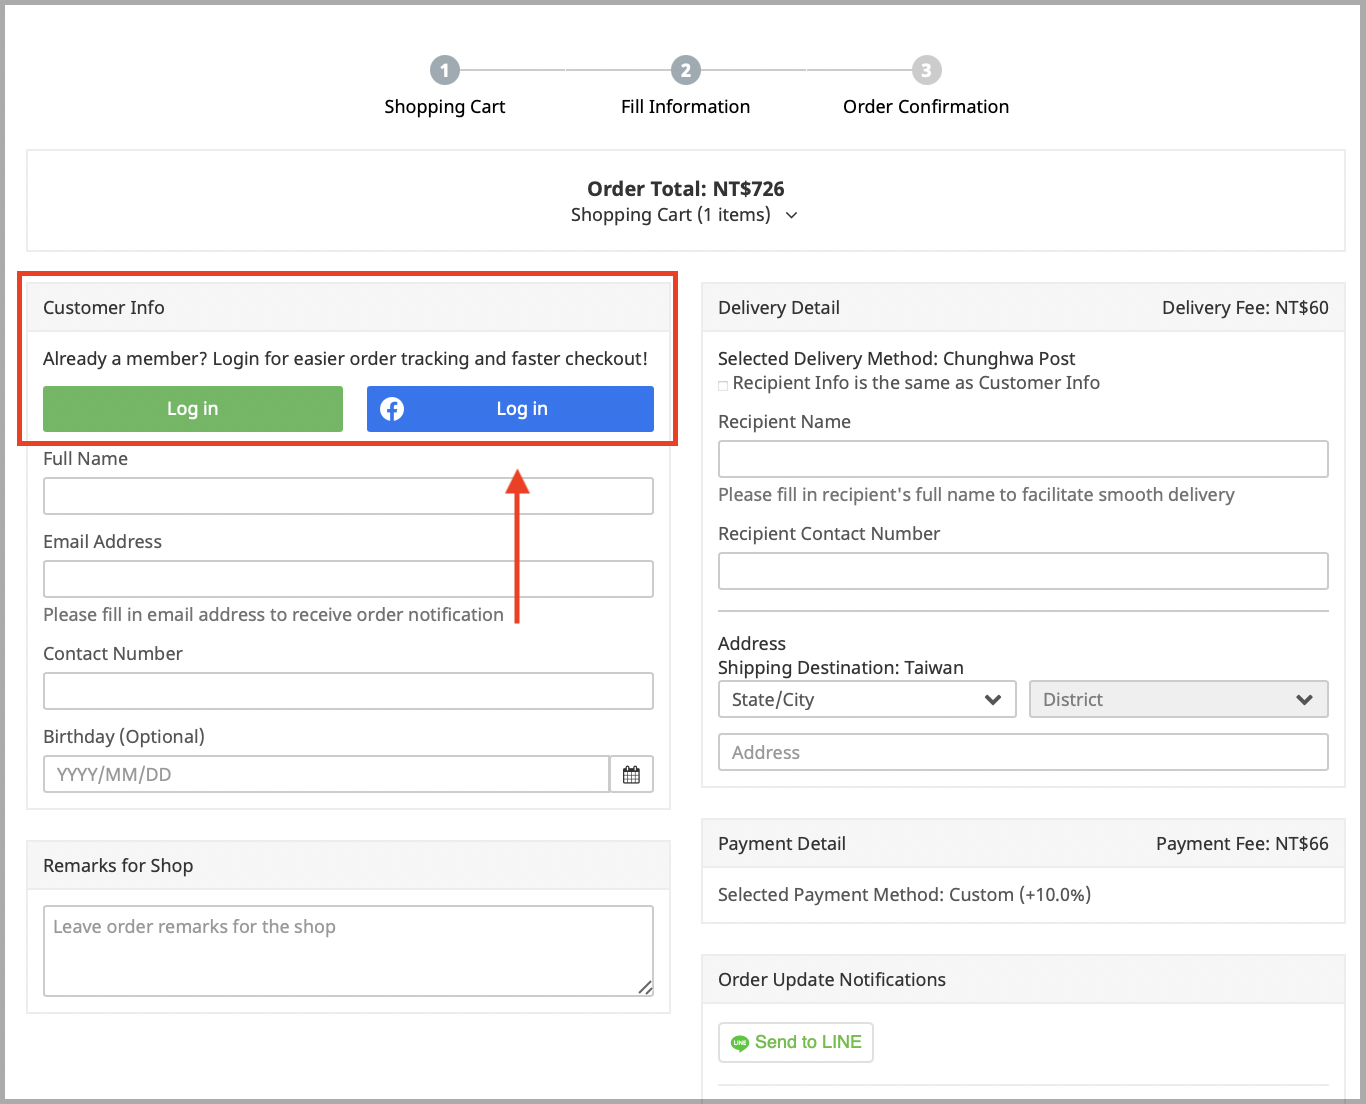
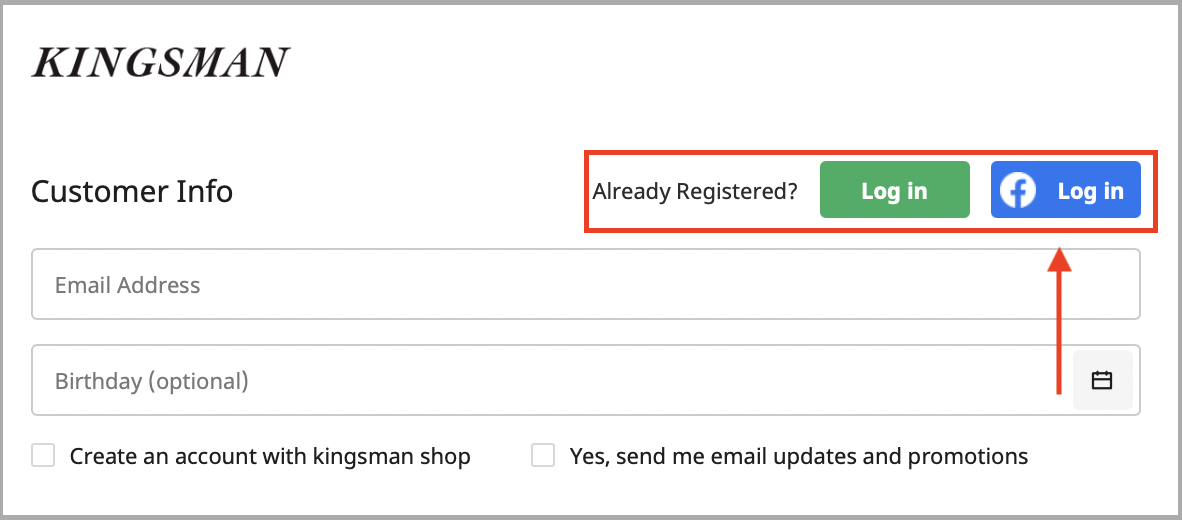
2. Facebook login button on checkout pages
Please confirm your store has enabled the Online Facebook Login feature. For more information, please refer to Step 10.
Regardless of which method you used above, the following page will display the "Facebook Login" button, and customers will be able to log in directly by clicking the login button.
*Notes:
-
The setup steps above do not apply to the setting up of the Facebook login button Shopper App.
If you want to show the Facebook login button on the Shopper App, please refer to Facebook account quick registration / member login|Shopper App. - Only customers who have registered through Facebook can use the "Log in with Facebook" button.
Member Sign-up / Sign-in page
Checkout pages: Cart & Fill Information
Express checkout page
Comments